🖥️ Eleventy plugin recs, part 1
Table of Contents
Intro
If you followed my guide on setting up Eleventy, you’ve already got a pretty solid blog. This guide is going to go over some of the plugins I use in Eleventy and how to incorporate them into your site.
Adding plugins to your .eleventy.js file
If you followed my guide from before, your .eleventy.js file probably looks something like this:
/my cool blog/.eleventy.js
/// Tells Eleventy to look for the Luxon plugin
const { DateTime } = require('luxon');

// Tells Eleventy to look for the RSS plugin
const pluginRss = require("@11ty/eleventy-plugin-rss");

// This is all the stuff that Eleventy is going to process when it exports your site

module.exports = function (eleventyConfig) {
    // Edit these to include your images, CSS, and other folders and files that you want to copy over to your public folder. "addPassThroughCopy" means it will copy those files over as-is without processing them, and addWatchTarget" line means it tracks changes and updates live when you use the --serve command
    eleventyConfig.addPassthroughCopy("./src/styles");
    eleventyConfig.addWatchTarget("./src/styles/");
    eleventyConfig.addPassthroughCopy("./src/images");
    eleventyConfig.addWatchTarget("./src/images/");
    eleventyConfig.addPassthroughCopy("./src/not_found.html");
    eleventyConfig.addPassthroughCopy("./src/.htaccess");

    // Load the RSS plugin
    eleventyConfig.addPlugin(pluginRss);

    // Adds Next & Previous links to the bottom of our blog posts
    eleventyConfig.addCollection("posts", function(collection) {
        const coll = collection.getFilteredByTag("posts");

        for(let i = 0; i < coll.length ; i++) {
            const prevPost = coll[i-1];
            const nextPost = coll[i + 1];

            coll[i].data["prevPost"] = prevPost;
            coll[i].data["nextPost"] = nextPost;
        }

        return coll;
    });

    // Return the length of a collection for tag clouds (thank you Claus!!)
    eleventyConfig.addFilter('length', (collection) => {
        return collection[1].length;
    });

    // Add the filter "readableDate" to simplify the way blog dates are presented
    eleventyConfig.addFilter('readableDate', (dateObj) => {
        return DateTime.fromJSDate(dateObj, { zone: 'utc+9' }).toFormat(
            'yyyy-LL-dd'
            );
        });

    // Slices up RSS posts
    eleventyConfig.addFilter("head", function (arr=[], count=1) {
        if (count < 0) {
            return arr.slice(count);
        }
        return arr.slice(0, count);
    });

    // Add the filter "topDate" to simplify the way blog dates are presented at the top of blog posts
    eleventyConfig.addFilter('topDate', (dateObj) => {
        return DateTime.fromJSDate(dateObj, { zone: 'utc+9' }).toFormat(
            'yyyy LLLL dd'
            );
        });

    // These are the folders that Eleventy will use. "src" is where you edit files that Eleventy will then take in and export into "public," which you upload.
        return {
            dir: {
                input: "src",
                output: "public",
            },
        };
    };
In general, you want to be careful about this line:
module.exports = function (eleventyConfig) {
  ...
}
Before this line, you establish what plugins you want Eleventy to use, and within the curly brackets of this line, you tell Eleventy how to use those plugins to process your files. That’s kind of confusing, but in general think of this line as bisecting your config: everything before this is gathering ingredients, everything within these brackets is cooking.
Also be aware that you can only have one “module.exports” line in your file. If you have more than one, Eleventy will throw up errors.
markdown-it, the Markdown parser
Eleventy already comes with some Markdown support right out of the box. If you want even more options though, you’re going to want markdown-it. I use this to automatically change my straight apostrophes and quotations into curly ones. You can see the full list of typographic replacements here.
Installing markdown-it
Open your terminal, point it at your blog’s folder, and install it by typing:
npm install markdown-itAdding markdown-it to .eleventy.js
Before the module.exports line above, add this to your .eleventy.js file:
// markdown-it plugin
const markdownIt = require("markdown-it");

const md = new markdownIt({
    html: true, // Enables HTML tags (the default in 11ty but not markdown-it)
    typographer: true, // Automatically converts "" and '' into curly quotations and apostrophes
});
And somewhere within the curly brackets for module.exports, add this:
// markdown-it options
  let options = {
    html: true,
    typographer: true
  };
  eleventyConfig.setLibrary("md", markdownIt(options));
  eleventyConfig.setLibrary("md", md);

  eleventyConfig.amendLibrary("md", function (md) {
    md.set({ typographer: true });
  });
Your full .eleventy.js file should now look like:
/my cool blog/.eleventy.js
// Tells Eleventy to look for the Luxon plugin
const { DateTime } = require('luxon');

// Tells Eleventy to look for the RSS plugin
const pluginRss = require("@11ty/eleventy-plugin-rss");

// markdown-it plugin
const markdownIt = require("markdown-it");

const md = new markdownIt({
    html: true, // Enables HTML tags (the default in 11ty but not markdown-it)
    typographer: true, // Automatically converts "" and '' into curly quotations and apostrophes
});

// This is all the stuff that Eleventy is going to process when it exports your site

module.exports = function (eleventyConfig) {
    // Edit these to include your images, CSS, and other folders and files that you want to copy over to your public folder. "addPassThroughCopy" means it will copy those files over as-is without processing them, and addWatchTarget" line means it tracks changes and updates live when you use the --serve command
    eleventyConfig.addPassthroughCopy("./src/styles");
    eleventyConfig.addWatchTarget("./src/styles/");
    eleventyConfig.addPassthroughCopy("./src/images");
    eleventyConfig.addWatchTarget("./src/images/");
    eleventyConfig.addPassthroughCopy("./src/not_found.html");
    eleventyConfig.addPassthroughCopy("./src/.htaccess");

    // Load the RSS plugin
    eleventyConfig.addPlugin(pluginRss);

    // Adds Next & Previous links to the bottom of our blog posts
    eleventyConfig.addCollection("posts", function(collection) {
        const coll = collection.getFilteredByTag("posts");

        for(let i = 0; i < coll.length ; i++) {
            const prevPost = coll[i-1];
            const nextPost = coll[i + 1];

            coll[i].data["prevPost"] = prevPost;
            coll[i].data["nextPost"] = nextPost;
        }

        return coll;
    });

    // markdown-it options
    let options = {
        html: true,
        typographer: true
    };
    eleventyConfig.setLibrary("md", markdownIt(options));
    eleventyConfig.setLibrary("md", md);

    eleventyConfig.amendLibrary("md", function (md) {
        md.set({ typographer: true });
    });

    // Return the length of a collection for tag clouds (thank you Claus!!)
    eleventyConfig.addFilter('length', (collection) => {
        return collection[1].length;
    });

    // Add the filter "readableDate" to simplify the way blog dates are presented
    eleventyConfig.addFilter('readableDate', (dateObj) => {
        return DateTime.fromJSDate(dateObj, { zone: 'utc+9' }).toFormat(
            'yyyy-LL-dd'
            );
        });

    // Slices up RSS posts
    eleventyConfig.addFilter("head", function (arr=[], count=1) {
        if (count < 0) {
            return arr.slice(count);
        }
        return arr.slice(0, count);
    });

    // Add the filter "topDate" to simplify the way blog dates are presented at the top of blog posts
    eleventyConfig.addFilter('topDate', (dateObj) => {
        return DateTime.fromJSDate(dateObj, { zone: 'utc+9' }).toFormat(
            'yyyy LLLL dd'
            );
        });

    // These are the folders that Eleventy will use. "src" is where you edit files that Eleventy will then take in and export into "public," which you upload.
        return {
            dir: {
                input: "src",
                output: "public",
            },
        };
    };
So again, do you see how those two parts above fit before and within the module.exports line? This is pretty much how all of your plugin installations will go.
Testing typographic replacements
Let’s duplicate one of our blog entries from our /src/posts/ folder and name it something like 2025-07-26-Typing-is-fun.md:
/my cool blog/src/posts/2025-07-26-Typing-is-fun.md
---
layout: post.njk
permalink: "posts/{{ page.date | date: '%Y-%m-%d' }}-{{ page.fileSlug }}.html"
title: Typing is fun!
description: It really is!
featured_image: favicon.png
tags:
  - journal
  - coding
---
"(c)(tm)(r)..." hello--what?????????????? ................. !!!!!!!!!!!
And ta-da, you have a blog entry that looks like:
/my cool blog/public/posts/2025-07-26-Typing-is-fun.md
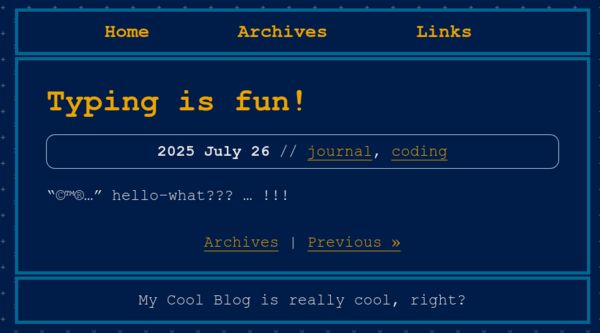
Bonus: You can see that you can add multiple tags to one post! I don't know why I didn't show this in the original guide!
Creating header anchors with markdown-it-anchor
Installing markdown-it-anchor
We’re going to build on to markdown-it with markdown-it-anchor to add those little # anchor links next to headings. Open your terminal and install with:
npm install markdown-it-anchorAdding markdown-it-anchor to .eleventy.js
Before the module.exports line above, add this to your .eleventy.js file:
// markdown-it header anchors
const anchor = require('markdown-it-anchor')

md.use(anchor, {
  permalink: anchor.permalink.linkInsideHeader({
    symbol: `<span aria-hidden="true">#</span>`,
    placement: 'before'
  })
})
And that’s it!
Testing header anchors
Time to duplicate another one of our blog entries from /src/posts/ folder and name it something like 2025-07-26-Fun-with-headings.md:
/my cool blog/public/src/2025-07-26-Fun-with-headings.md
---
layout: post.njk
permalink: "posts/{{ page.date | date: '%Y-%m-%d' }}-{{ page.fileSlug }}.html"
title: Fun with headings
description: So much fun
featured_image: favicon.png
tags:
  - journal
  - coding
---
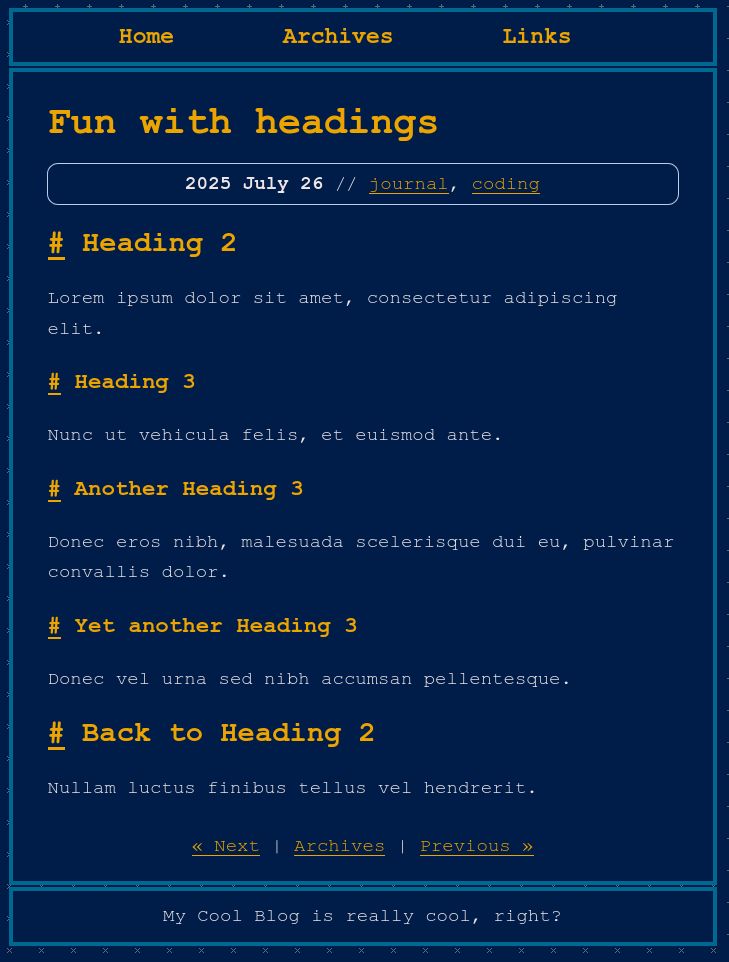
## Heading 2

Lorem ipsum dolor sit amet, consectetur adipiscing elit.

### Heading 3

Nunc ut vehicula felis, et euismod ante.

### Another Heading 3

Donec eros nibh, malesuada scelerisque dui eu, pulvinar convallis dolor.

### Yet another Heading 3

Donec vel urna sed nibh accumsan pellentesque.

## Back to Heading 2

Nullam luctus finibus tellus vel hendrerit.
Hooray, we have anchor links next to our headings now!
/my cool blog/public/posts/2025-07-26-Fun-with-headings.html
Ignoring headers in markdown-it-anchor
But what happens if you don’t want anchor links for some headings, like our Recent Blog Posts section on our front page?
/my cool blog/public/index.html
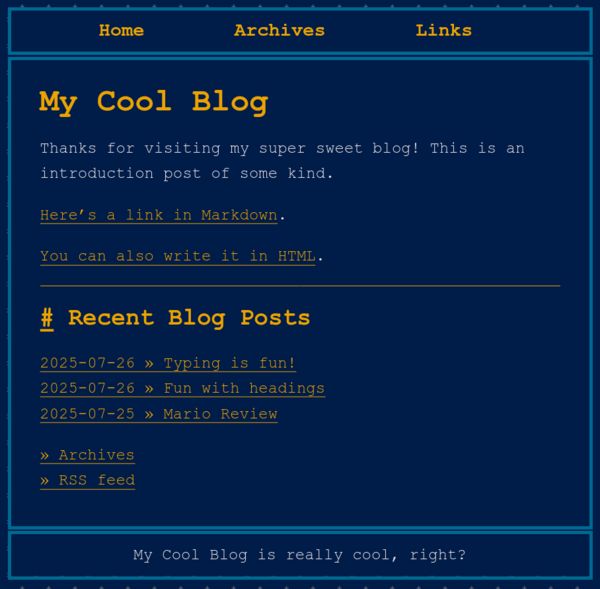
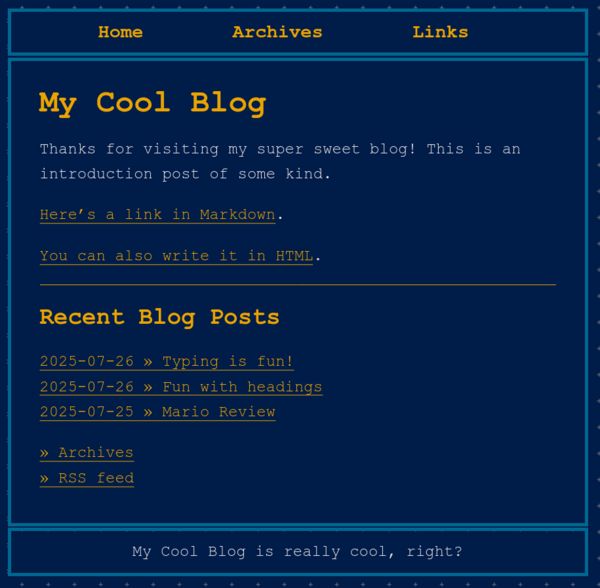
This is kind of a hacky way around it, but since markdown-it-anchor does not process <h2>, <h3>, <h4> and so on, you can replace the Markdown headings with HTML. So for example, I’ve changed the line in index.md from ## Recent Blog Posts to <h2>Recent Blog Posts</h2> so that it now looks like:
/my cool blog/src/index.md
---
layout: base.njk
title: My Cool Blog
description: This blog is totally sweet, right?
featured_image: favicon.png
---
Thanks for visiting my super sweet blog! This is an introduction post of some kind.

[Here's a link in Markdown](https://time.is/).

<a href="https://time.is">You can also write it in HTML</a>.

---
<!-- This next part will show your top three most recent posts. You can change how readableDate looks in your .eleventy.js file-->
<h2>Recent Blog Posts</h2>

<div id="recentPostList">
  <ul>
  {% assign top_posts = collections.posts | reverse %}
  {%- for post in top_posts limit:3 -%}
    <li><a href="{{ post.url }}">{{ post.date | readableDate }} » {{ post.data.title }}</a></li>
  {% endfor %}
  <li class="moreposts"><a href="archives.html">» Archives</a></li>
  <li class="moreposts"><a href="rss.xml">» RSS feed</a></li></ul>
</div>
And that removes the anchor link from the Recent Blog Posts header:
/my cool blog/public/index.html
Adding a Table Of Contents with eleventy-plugin-nesting-toc
Installing eleventy-plugin-nesting-toc
Time to install the eleventy-plugin-nesting-toc plugin by opening your terminal and entering:
npm i --save eleventy-plugin-nesting-tocAdding eleventy-plugin-nesting-toc to .eleventy.js
Before the module.exports line above, add this to your .eleventy.js file:
// eleventy toc plugin
const pluginTOC = require('eleventy-plugin-nesting-toc')
And somewhere within the curly brackets for module.exports, add this:
// Add TOC
eleventyConfig.addPlugin(pluginTOC, {ignoredElements: ['span']});
That part that says ignoredElements are the options that you can set for this plugin, check here for the full list.
Before we check out what it looks like, we’re going to make a brief tangent into…
Creating custom metadata fields and if statements
As we covered last time, you can actually create whatever metadata fields you want in the frontmatter. Let’s look at the frontmatter of that last blog entry:
/my cool blog/public/src/2025-07-26-Fun-with-headings.md
---
layout: post.njk
permalink: "posts/{{ page.date | date: '%Y-%m-%d' }}-{{ page.fileSlug }}.html"
title: Fun with headings
description: So much fun
featured_image: favicon.png
tags:
  - journal
  - coding
---
I want this post to have a table of contents, but I don’t necessarily want all of my posts to have one. I could create a new template like post-toc.njk and set just this entry to use that layout in the frontmatter, but that seems like overkill. What we can do is add a toc field to this entry, and then add an if statement into our post.njk that will add a table of contents for entries with the toc setting but not any of the others.
Adding custom fields to the frontmatter
So, okay. First, let’s add a toc: true field to the frontmatter:
---
layout: post.njk
permalink: "posts/{{ page.date | date: '%Y-%m-%d' }}-{{ page.fileSlug }}.html"
title: Fun with headings
description: So much fun
featured_image: favicon.png
tags:
  - journal
  - coding
toc: true
---
Easy! You could go to your other blog entries and set them to toc: false if you wanted to, but having no toc field is the same as flagging it false anyway, so I wouldn’t bother.
Adding if statements to your template
Now, let’s open our post.njk file, which you will remember looks like this:
---
title: "My Cool Blog: {{ title }}"
---
<!DOCTYPE html>
<html lang="en">
  <head>
    <link href="https://yourwebsitehere.com/rss.xml" rel="alternate" type="application/rss+xml" title="RSS feed for My Cool Blog">
    <title>My Cool Blog: {{ title }}</title>
    <meta charset="UTF-8">
    <meta name="viewport" content="width=device-width, initial-scale=1.0">
    <meta name="description" content="This is the description for My Cool Blog!">
    <link rel="icon" href="../images/favicon.png" type="image/x-icon">
    <link href="../styles/style.css" rel="stylesheet" type="text/css" media="all">
    <meta property="og:type" content="article">
    <meta property="og:title" content="{{ title }}">
    <meta property="og:url" content="https://yourwebsitehere.com{{ page.url }}">
    <meta property="og:image" content="https://yourwebsitehere.com/images/{{ featured_image }}">
    <meta property="og:description" content="{{ description }}">
  </head>

  <body>
    <main id="container">

      <div id="headerArea">
        <!--If you wanted to put in a header image, this is where you would do it-->
        <nav id="navbar">
        <!--This is where you edit the navbar links at the top of the page-->
          <ul>
            <li><a href="../index.html">Home</a></li>
            <li><a href="../archives.html">Archives</a></li>
            <li><a href="../links.html">Links</a></li>
          </ul>
        </nav>
      </div>

      <!--This is where the bulk of your page lives-->
      <div id="flex">
        <article>
          <h1>{{ title }}</h1>

          <div class="postMetadata">
          <!--You can change how topDate looks in your .eleventy.js file-->
          <strong>{{ page.date | topDate }}</strong> //
          <!--This will list the tags on your post EXCEPT for the "post" tag, separated by commas-->
          {% set comma = joiner() %}
            {% for tag in tags -%}
              {% if tag !== 'posts' %}<a href="../tags/{{ tag | slugify }}.html">{{ tag }}</a>{%- if not loop.last %}, {% endif %}
            {% endif %}
          {%- endfor %}</div>

          <!--The content of your post-->
          {{ content | safe }}

          <!--This will take you to the next/previous blog entries if they exist-->
          <nav id="nextprev">
          {% if nextPost.url %}
          <a class="next" href="{{ nextPost.url }}">« Next</a> |
          {% endif %}
          <a href="../blog.html">Archives</a>
          {% if prevPost.url %}
          | <a class="previous" href="{{ prevPost.url }}">Previous »</a>
          {% endif %}
          </nav>
        </article>
      </div>

      <!--Edit in your footer here, or delete it entirely if you want-->
      <footer id="footer">My Cool Blog is really cool, right?</footer>

    </main>

    <!--this will add a 'Go to top' button on your site-->
    <button onclick="topFunction()" id="topBtn" title="Go to top">Top</button>

    <script>
      let topbutton = document.getElementById("topBtn");
      window.onscroll = function() {scrollFunction()};
      function scrollFunction() {
        if (document.body.scrollTop > 20 || document.documentElement.scrollTop > 20) {
          topbutton.style.display = "block";
        } else {
          topbutton.style.display = "none";
        }
      }
      function topFunction() {
        document.body.scrollTop = 0;
        document.documentElement.scrollTop = 0;
      }
    </script>
    <!--end top button code-->

  </body>
</html>
So now I can add this bit above {{ content | safe }}:
<!--Adds a table of contents at the top of posts that have "toc: true" in the frontmatter:-->
{% if toc %}<h2>Table of Contents</h2>

  {{ content | toc | safe }}

  <hr>{% endif %}

  <!--The content of your post-->
  {{ content | safe }}
Everything between {% if toc %} and {% endif toc %} (i.e. the table of contents) will appear for entries flagged with toc: true, and entries that aren’t flagged won’t have it. This way you can set which entries will have a table of contents and which won’t.
Testing the table of contents
Time to duplicate another blog entry and test this out!
/my cool blog/public/src/2025-07-26-Instructions.md
---
layout: post.njk
permalink: "posts/{{ page.date | date: '%Y-%m-%d' }}-{{ page.fileSlug }}.html"
title: Instructions
description: Step by step!
featured_image: favicon.png
tags:
  - journal
  - coding
toc: true
---
## Step 1

Pet the cat.

### Step 1a

But not too hard.

### Step 1b

He WILL bite.

## Step 2

Feed the cat

### Step 2a

He hungy
Which will give us a table of contents at the top of the page:
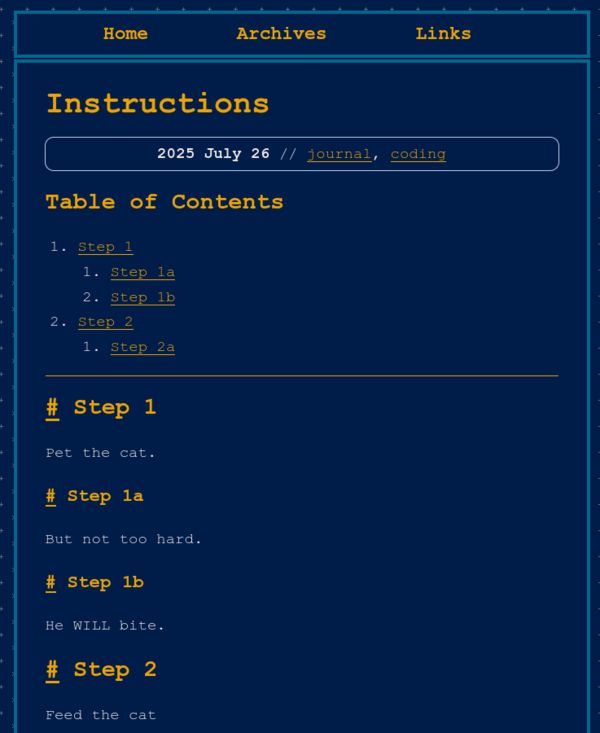
But you should notice that the previous blog entry we made does not have a table of contents, despite having headings. You can add one by putting toc: true in the frontmatter for it.
Okay, I have a few more plugins that I wanted to cover, but I think this is a good stopping point for now. It is 3am!! I need to sleep!! I will be back soon with a Part 2, I hope!!